Personal edition · setup guide
Install it on your own
Windows machine.
The personal edition runs on your own computer or a local machine; your files and analyses stay there. Most users are on Windows: import the platform image through WSL and it runs, with files handled exactly as they are on Windows. The three videos below cover everything from import to IM access.
The short answer
The personal edition puts the whole cc-bioinfo analysis environment onto your own machine — it is not a cloud service, and it needs no second server. On Windows you import one image through WSL; the platform, the Conda environments, the raw data and all computation then live locally. Open a browser and work; files are read and written just as they are on Windows.
- What you install: a single image of about 5 GB containing the platform and a pre-built R/Python analysis environment — nothing to configure yourself
- How you install it: three steps — import through WSL, enter a model API key, connect WeChat or another IM — each with a video
- What machine it needs: Windows 10/11 with WSL2, 16 GB of memory minimum and 32 GB for comfort, plus 300 GB of free disk
three videos, 1 min 49 s in total
platform + pre-built R/Python environment
32 GB recommended for single-cell
for data, environments and intermediates
Before you start: machine requirements and getting the image
The personal edition moves the whole Linux environment onto your own machine — platform, conda environments, raw data and computation all run locally. Size the machine for real single-cell and spatial work, not for opening a web page.
| Item | Requirement | Notes |
|---|---|---|
| Operating system | 64-bit Linux — native, WSL2 or a VM (Ubuntu 24.04+) | macOS and bare Windows are not supported; on Windows, enable WSL2 first — video 01 shows how |
| Memory | 16 GB minimum, 32 GB recommended | 16 GB handles routine studies; single-cell work is memory-hungry — cell communication on 100,000 cells alone needs about 16 GB, so go to 32 GB for larger data |
| Disk | 300 GB free recommended | Holds the image, conda environments, raw data and intermediate results |
| CPU | 4 cores or more | More cores means faster parallel analysis |
| Image size | About 5 GB | Compressed; the imported environment takes more |
A weaker machine will still run it, but large datasets will hit memory limits — exactly the situation documented in the pain points Q&A.
Getting the package: buying on Gumroad gets you a zip install package with INSTALL.md, and the license key arrives with your receipt; buyers in mainland China receive a WSL system image via cloud storage instead. The differences are laid out in section 03 below. Once you have it, follow the three steps.
Three steps to a working install
-
Import the platform in WSL
Enable WSL on Windows, import the platform image we provide, and open cc-bioinfo in your browser once it starts. No separate server, and no manual R/Python environment setup.
Video 01 · WSL import and first start
-
Configure a model provider
The platform is not locked to a single model provider. Enter your own API key in settings to connect Anthropic Claude, AWS Bedrock, DeepSeek or Kimi; or switch to a local Ollama model so the conversation content stays on your machine too.
Video 02 · Model providers and API keys
-
Connect WeChat and other IM channels
Once configured, you can send instructions and receive results and figures through WeChat, DingTalk, Feishu or Telegram — so you can follow a running job while away from the machine.
Video 03 · IM channel setup
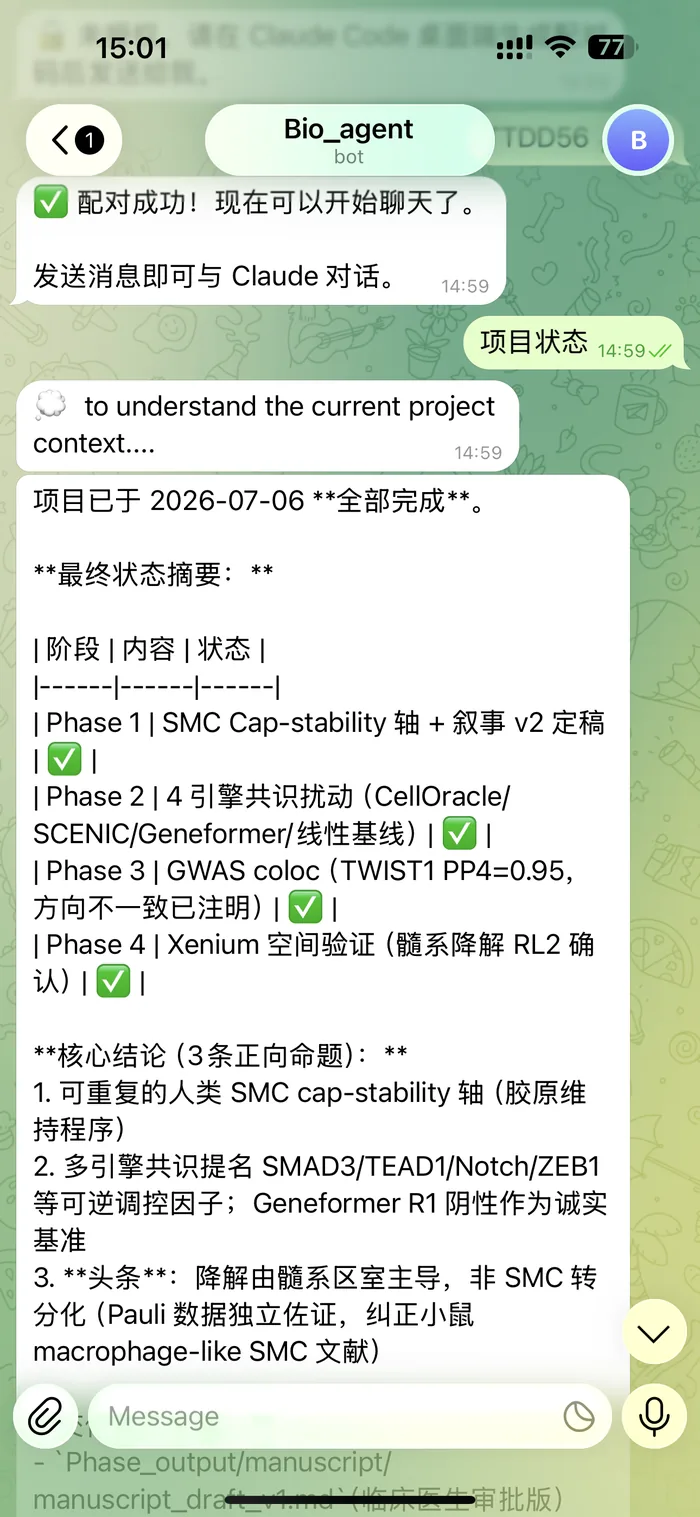
What it looks like once connected · asking "project status" in Telegram returns all four phases and the core findings — a real progress report from the study in case two
If you hit a problem during setup, or want to see how it works first, email tangmoogmoogtang@gmail.com.
Package and license key: the two channels deliver different things
| Gumroad (international) | Xiaohongshu-channel (mainland China) | |
|---|---|---|
| Deliverable | zip install package with INSTALL.md | WSL system image archive (about 5 GB) via cloud storage, bio-design and bio-analyze pre-installed |
| License key | Issued with your Gumroad receipt; usage is described in INSTALL.md (activation is optional) | No key — import the image and use it, no activation |
| Supported systems | Native Linux / WSL2 / VM (Ubuntu 24.04+) | Windows 10/11 with WSL2 |
| Archive password | None | www.cc-bioinfo.com |
fully automatic, self-check at the end
up to ~15 min on a slow connection
the platform itself is ~1 GB
Node.js 20 installed by the installer
macOS and bare Windows (without WSL) are not supported. Licensing (per researcher, up to 2 of your own machines) and refunds: see the license and refund terms.
First boot: change the default password
The Linux system account inside the image ships with a default password (printed in the notes that come with your package — not on this page). On first boot, run passwd in the terminal and follow the prompts to set your own; this does not affect the platform or your data.
The personal edition listens only on your own machine and opens no ports to the public internet, but on a shared computer or an office LAN the default password should still be the first thing you change.
FAQ: questions people ask before and after installing
What is the difference between the personal and enterprise editions?
The personal edition is for one researcher, installed on your own machine, with your files and analyses staying on it. The enterprise edition targets departments, labs, hospitals and universities: self-hosted deployment, per-user isolation, institutional account authentication and deployment support. The personal edition is $50 on Gumroad; the enterprise edition is quoted by email, deployment support included. See how to get it.
Is my analysis data uploaded to the cloud?
The platform, the Conda environments, the raw data and the computation all sit on your own machine. What needs network access is the model call — the platform reaches the API of whichever provider you configure. If you need the inference to stay off the network too, switch the settings to a local Ollama model so the conversation content stays on the machine too.
Can I install it on an under-spec machine?
Yes, you just risk running out of memory on large datasets. 16 GB handles ordinary projects; single-cell work is memory-hungry — cell-cell communication on 100,000 cells alone needs around 16 GB — so go for 32 GB if your datasets are large.
Do I have to install R, Python and Conda myself?
No. The whole Linux analysis environment is packaged in the image; import it and work straight from the browser. No second server to provision, no hand-built R/Python environment — which is exactly the first barrier described in the pain points Q&A.
Do I have to use one particular model provider?
No. The platform supports five model providers — Anthropic, AWS Bedrock, DeepSeek, Kimi and Ollama. Put your own API key in the settings and switch whenever you like; with Ollama the model runs locally.
If I close the browser, does a running analysis stop?
No. The analysis runs inside the imported Linux environment; the browser is only the interface. Closing the tab does not affect a running job, and the progress is there when you come back. Once IM is wired up, progress cards are pushed to your phone as well.
How do I get the image, and what is the archive password?
After purchase we provide a download link via cloud storage. The archive is about 5 GB and the extraction password is www.cc-bioinfo.com. Then follow the three steps above.
Can I try it before buying?
Yes. The fastest way is the trial platform at test.cc-bioinfo.com (no sign-in needed) — no install, no environment setup, and no need to prepare data first. For a dedicated trial environment, email tangmoogmoogtang@gmail.com.
How long does installation take?
On the Gumroad channel the zip installer runs 9 automatic steps in a measured 4–5 minutes (up to about 15 on a slow connection); most of the time goes to downloading bun, Node.js 20, nginx and the plugin marketplaces. On the mainland-China image channel you unpack the ~5 GB archive and import it into WSL with one command — the full demonstration in video 01 is 44 seconds, and real time depends on disk speed.
How much disk does the platform itself use, and where does 300 GB come from?
The platform itself is about 1 GB (server and frontend ~312 MB, the two skills and plugin marketplaces ~686 MB); with the system dependencies the installer pulls in, actual disk growth is about 2 GB — leave at least 3 GB for the platform. The 300 GB is not platform usage: it is the recommended headroom for your raw data, per-project Conda environments and intermediate results, which single-cell and spatial studies reach easily.
Does installation need internet access? Can I use it offline afterwards?
Internet access is required during installation: the installer downloads bun, Node.js 20, nginx and the plugin marketplaces. Day-to-day use afterwards works offline, with one exception — calls to your model provider. Choose a local Ollama model and even that step stays on the machine.
Do I have to start the platform by hand after a reboot?
No. The installer registers the platform to start at boot; it comes back automatically after a restart and projects resume from their last state. The personal edition has no login page — open the local address in a browser and you are in the workbench.
Is macOS supported? What about Windows without WSL?
Neither. Supported forms are Windows 10/11 with WSL2, native Linux (Ubuntu 24.04 or newer) and virtual machines; macOS and bare Windows are outside the supported range, which the license and refund terms also state — an environment that does not meet the requirements is not grounds for a refund.
Do I need a GPU?
No. Routine omics analyses — differential expression, enrichment, single-cell clustering and annotation, Mendelian randomization, colocalization — run on CPU, and memory matters far more than a GPU. If your machine has one, confirm on first use that the platform detected it: in our own testing a GPU passed through to WSL2 was once misjudged as "no GPU" — see section 05 of How to choose.
How many machines does one license cover? What if I change computers?
Licensed per researcher: one named individual on up to 2 machines you personally use (a laptop plus a lab workstation, say). The license follows you, not the hardware, so replacing a machine is allowed. The personal edition may not be used to provide a multi-user service. Full text on the license and refund page.
How do I upgrade, and will I lose data?
Gumroad channel: unpack the new zip and rerun setup.sh; the installer detects the existing installation and upgrades in place, keeping sessions and project data — 113 sessions verified intact before release. Image channel: updated images are provided with each release; follow the notes that come with the package.
Which two skills are pre-installed?
bio-design (study design) and bio-analyze (analysis execution) ship inside the package and are there as soon as you import — nothing to install separately; their versions move with each release, so the notes inside the package are authoritative. Both skills can also be installed into Claude Code on their own; what the platform adds is the isolated, resident execution environment and the complete audit trail.
Last updated: